

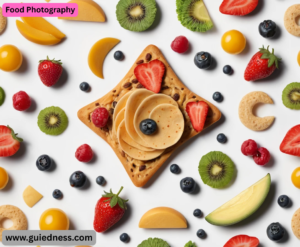
Food Photography Of course! Food photography is the art of creating compelling, mouth-watering images of food. It’s used in restaurants, cookbooks, food blogs, advertising, and social media. This guide will break it down into the essential elements, from gear to styling to editing.
The Goal: Make the Food Look Irresistible
- The core principle is to make the viewer feel hungry, tell a story, and evoke an emotion. It’s not just about documenting a plate; it’s about selling an experience.
Essential Gear (You Don’t Need the Most Expensive Stuff!)
- You can start with a smartphone, but as you progress, you might want to invest in more equipment.
- Camera:
- Smartphone: Modern smartphones have incredible cameras, fantastic computational photography (like portrait mode), and are always with you. They are perfect for beginners and social media.
- DSLR or Mirrorless: These give you more control over settings like aperture, shutter speed, and ISO. A popular starter lens is a 50mm f/1.8 (a “nifty fifty”) because it’s sharp, affordable, and creates a beautiful blurry background (bokeh).
- Tripod: Essential for consistency, shooting in low light (to avoid blur), and for overhead shots. It also allows you to style the food without holding the camera.
Lighting: This is the MOST IMPORTANT element.
- Natural Light: The best and cheapest light source. Shoot near a large window. Avoid direct, harsh sunlight as it creates strong shadows. Use a sheer white curtain to diffuse the light and make it soft and flattering.
- Artificial Light: If you shoot at night or in a dark space, a simple softbox or a LED panel can mimic window light. The key is to soften the light.
- Reflectors and Diffusers: A simple piece of white foam core or poster board can act as a reflector to bounce light back onto the food and fill in harsh shadows. A diffuser (like a translucent sheet) softens hard light.
- Styling Tools: Tweezers for precise placement, droppers for oil or sauce, kitchen torch to re-melt cheese, spray bottles for water droplets, and various cloths for wiping edges.
Camera Settings & Technique
For Smartphones:
- Tap to Focus: Tap the screen on the most important part of the dish (e.g., the main piece of protein) to ensure it’s sharp.
- Adjust Exposure: Use the slider that appears after you tap to focus to brighten or darken the image.
- Shoot in RAW: If your phone has a “Pro” mode that allows it, shooting in RAW format gives you much more data to work with in editing.
- Clean Your Lens! A smudged lens ruins image clarity.
For DSLR/Mirrorless Cameras:
- Shooting Mode: Use Aperture Priority (A or Av) or Manual (M).
- Aperture: Use a wide aperture (low f-number like f/2.8 or f/3.5) to blur the background and make the subject pop. For overhead flat lays where everything needs to be in focus, use a narrower aperture (higher f-number like f/8 or f/11).
- ISO: Keep it as low as possible (e.g., ISO 100 or 200) to avoid graininess (noise). Only increase it if the light is very low.
- White Balance: Set this correctly for your light source to ensure colors are accurate. Shooting in RAW allows you to adjust this perfectly in post-processing.
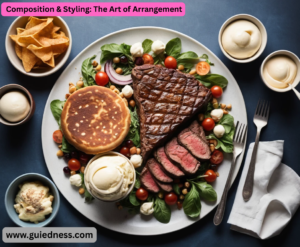
Composition & Styling: The Art of Arrangement
This is where you tell the story.Angle is Everything:
- Overhead (Flat Lay): Perfect for tablescapes, pizzas, bowls, and showing the entire spread. It emphasizes patterns and layout.
- 45-Degree Angle: The most common and natural angle. It feels like you’re sitting at the table looking at the food. It shows the top and sides of the dish.
- Straight-On (0-Degree): Great for tall foods like burgers, cakes, and stacked pancakes. It emphasizes height and layers.
- Place the key element of your dish (e.g., the steak, the scoop of ice cream) at one of the intersecting points for a more dynamic composition.
- Props and Backgrounds: Choose props (plates, cutlery, napkins) that complement the food and don’t steal the show. Neutral colors (white, grey, wood, black slate) are often safest. The background should provide context but remain simple.
- Texture and Layers: Add visual interest with garnishes (fresh herbs, sesame seeds), drips, crumbs, and a variety of textures (creamy, crunchy, gooey).
- The “Hero”: There should be one main subject. Everything else in the frame should support it.
Pro Styling Tricks (The “Fake” Food)
- Food Photography Many professional food photos use tricks to make the food look perfect under hot lights.
- Oil & Water: Use a spray bottle to make vegetables and salads look fresh and dewy. Brush meat with oil to make it look glossy and freshly cooked.
- “Glue” Milk: Use white glue instead of milk in cereal bowls—it doesn’t make the cereal soggy.
- Motor Oil: For syrup on pancakes, motor oil is used because it’s thicker and doesn’t soak in as quickly.
- Fake Ice Cream: Mashed potatoes are often used instead of ice cream because it doesn’t melt under the lights.
- Steam: The “steam” from a hot cup of coffee is often created by dropping a hot cotton ball soaked in water into the cup or added in post-production.
Post-Processing & Editing
- The goal is to enhance, not completely alter, the image.
Basic Adjustments:
- Crop & Straighten: Fix the composition.
- Exposure/Brightness: Make sure the image is well-lit.
- Contrast: Add a little to make the image pop.
- White Balance: Correct any color casts to make the food look natural.
- Saturation/Vibrance: Boost the colors slightly to make them look fresh and appealing.
Advanced Tweaks:
- Sharpening: Apply subtle sharpening to the details of the food.
- Spot Removal: Clean up any crumbs or distractions on the plate or background.
Popular Apps & Software:
- Phone: Adobe Lightroom Mobile, VSCO, Snapseed
- Computer: Adobe Lightroom (most popular), Adobe Photoshop, Capture One.
Quick-Start Cheat Sheet
- Find Your Light: Set up next to a large window, not in direct sun.
- Choose Your Angle: 45 degrees for most dishes, overhead for flat lays.
- Style the Scene: Use simple props, add texture garnishes, and tell a story.
Mastering Light: Beyond the Window
- Light has four key qualities: Direction, Intensity, Hardness/Softness, and Color. Controlling these is what separates good photos from great ones.
Direction:
- Backlighting (The Gold Standard): Placing your main light source behind the food, slightly off to one side. This creates incredible depth, highlights textures (like the crumbs on a muffin top), and creates a beautiful “rim light” or glow around the subject. It makes liquids (soup, coffee) and translucent foods (berries, greens) sparkle.
Sidelighting: Light comes from the side. Excellent for emphasizing texture—think of the gritty crumbs of a brownie or the grilled marks on a steak. It creates dramatic shadows and a moody, artistic feel.
- Frontlighting: Light comes from behind the photographer. This tends to flatten the image, reducing texture and depth. It’s generally the least flattering for food.
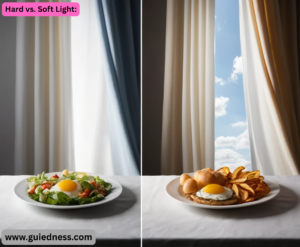
Hard vs. Soft Light:
- Food Photography Hard Light: Comes from a small, direct source (like the sun at noon, a bare flash). Use it intentionally for dramatic, high-energy shots.
- Soft Light: Comes from a large, diffused source (a window with a curtain, a large softbox, a cloudy sky). It wraps around the food, creating soft, gradual shadows and is very forgiving. This is the most common style for food as it looks gentle and appetizing.
Color Temperature:
- Warm Light (morning/evening sun, tungsten bulbs): Creates a cozy, inviting, and comfortable feeling. Perfect for rustic bread, roasted coffee, Thanksgiving dinner.
- Cool Light (shade, overcast sky, some LEDs): Feels fresh, clean, and modern. Ideal for salads, minty desserts, ice cream, smoothies.
. Storytelling & Conceptualization
A great food photo makes the viewer ask a question or imagine a narrative.
- The Scene: Is the food at a bustling family dinner table with multiple plates and glasses (implying company)? Or is it a quiet, minimalist morning with a single cup of coffee and a book? The props and setting build the world.
- Food Photography The Process (The “In Situ” Shot): Show the food being made. A hand pouring syrup over pancakes, sprinkling salt on a steak, or placing a garnish on a dessert. This adds a human element and a sense of action. It feels authentic and engaging.
- The Ingredient Shot: Photograph the beautiful raw ingredients alongside the finished dish. This tells a story of freshness, simplicity, and craftsmanship.
- The “Breakage”: A bite taken out of a cookie, a slice cut from a pie, crumbs on the plate. This implies someone was there, it was delicious, and it invites the viewer to imagine taking the next bite.
. Finding and Developing Your Style
- Your style is your visual signature. It’s what makes your photos recognizable in a feed without seeing your name.
- Analyze What You Love: Create a mood board (Pinterest is great for this). Save images you’re drawn to. After collecting 50+, look for patterns.
- Light & Bright (Airy): High exposure, light backgrounds (white, light wood, pastels), soft shadows. Feels fresh, clean, and healthy.
- Dark & Moody (Chiaroscuro): Lower exposure, dark backgrounds (dark wood, slate, black), dramatic shadows with pools of light. Feels rustic, luxurious, and intimate.
- Color Palette: Do you gravitate towards warm tones (browns, oranges, reds) or cool tones (blues, greens, greys)? A consistent color palette is a huge part of a cohesive style.
- Experiment and Refine: Don’t just copy others. Try to recreate a look you like, then add your own twist. Your style will naturally evolve as you shoot more.
Advanced Pro Tips & Problem-Solving
Salad looks wilted under the lights.
- The Fix: Spray it with water mixed with a tiny bit of glycerin. The glycerin makes the water droplets bead up and last longer than plain water.
Meat looks dull and grey.
- The Fix: Sear it quickly on all sides, but leave it raw inside. Then, use a brush to apply a mixture of oil and soy sauce (or Kitchen Bouquet) to give it a perfect, glossy, cooked color. Slice it just before shooting.
Ice cream melts.
- Food Photography The Fix: The classic is mashed potatoes. For a more edible solution, use a scoop of very cold ice cream that’s been dipped in liquid nitrogen, or work incredibly fast. Another trick is to mix the ice cream with a stabilizer or to use a mixture of shortening and powdered sugar for a “fake” scoop that holds its shape.
Cheese isn’t pulling on the pizza.
- The Fix: Use a combination of hot cheese (for the melt) and stringy materials like white glue or mozzarella “threads” placed strategically with tweezers.
Beyond the Still Image: Video & Reels
- Short-form video is dominant. The principles of good food photography apply directly to video.
- Hero Shots are Key: Your video should have a “hero moment”—the pour, the pull, the slice, the sprinkle. This is the satisfying climax.
- Movement: Use simple, smooth movements. A slow pull-back, a gentle pan across the scene, an overhead tilt down to the food.
- Lighting is Even More Critical: Video requires consistent light throughout the shot. Any flicker or change will be very noticeable.
- Sound: The sizzle of a steak, the crunch of a taco, the glug of a pour—ASMR-like sound design is half the experience in food video.